Table of contents
1 About this article
1.1 Watch my language
2 The Big Picture
3 Hardware requirements
3.1 Linux worst enemy: Wi-Fi drivers
3.1.1 ath9k/ath9k-htc (The good Atheros)
3.1.2 ath10k (The bad Qualcomm/Atheros)
3.1.3 Realtek
3.1.4 Ralink/Mediatek
3.1.5 Broadcom
3.1.6 Intel
3.2 Buyers Guide
4 Monitor and inject
4.1 Preparation
4.2 Enabling Monitor Mode
4.3 Capturing frames
4.4 Injecting frames
5 Pitfalls
5.1 Using a VM
5.2 Frequency Hopping
5.3 Move fast and break things faster
5.4 Fuzzing
6 Conclusion
1 About this article
This article aims to be the collected wisdom of everything I learned while trying to fuzz the Wi-Fi stack of Espressifs esp8266.
We assume that you, dear reader, be familiar with Linux command line basics. You do not need any deep understanding of how 802.11 works, but it could be beneficial for advanced topics we discuss in the second half of the article.
It is important to know that documentation regarding frame injection on the internet is sparse and mostly outdated. If you find conflicting information, chances are that this article is correct (that is, for the foreseeable future. Last fact check: 2023-01-13).
This article is structured as follows: First, I explain some general terms around wireless LAN, then I introduce the big picture of why I need to be able to arbitrarily alter my wireless connection. Next, I explore the hardware and software requirements to do so. Lastly, I discuss how to use the monitor mode for passive listening and frame injection and close with a section of assorted pitfalls in which I fell so you don’t have to.
1.1 Watch my language
Throughout this document, I might occasionally use language specific to 802.11. Below you’ll find a list of terms you will be encountering regularly and their definitions in plain (and sometimes not-so-plain) English.
802.11 IEEE Standard covering wireless networks in various substandards and speeds (a/b/g/n/ac/ax). Commonly known as WLAN or Wireless LAN.
Wi-Fi Think WLAN with a fancy name and an expensive certification. Commonly used interchangeably with WLAN or 802.11.
monitor mode A network adapter mode that allows access to all Layer 2 frames that traverse through this device.
2 The Big Picture
Wireless LAN has been around for more than 20 years. Connected devices have become ubiquitous, bringing the standard from a niche technology to the mainstream way to access the internet[1].
However, due to the nature of radio signals not caring about directions, keeping wireless communication secure has long been understood to be crucial.
More specifically, this involves two layers: first, the radio communication itself (which is currently solved by WPA3, the fourth attempt to encrypt Wi-Fi correctly) and secondly the firmware and driver stack of the radio communication cards. They, by design, interact with just about anyone throwing 802.11 frames at them and thus become a target simply by being present.
While the actual communication encryption is rather open and has faced much scrutiny by the academic and industrial community, programming errors in the drivers and firmware are mostly left for the respective hardware’s vendor to discover and hopefully fix. For desktop operating systems, most drivers used today have a long development history and have been subject to third-party testing[2]. Considering the class of embedded devices, however, paradigms shift from communication speed first to power consumption first. In the process, new Wi-Fi stacks have emerged that lack the community testing carried out on more traditional hardware.
As security certifications for IoT hardware grow in popularity, it is important to facilitate third-party audit and pentesting possibilities. A key area of interest are programming errors that lead to denial-of-service attacks or remote code execution attacks. If such attacks were possible in the very early, unauthenticated and unencrypted modes of a Wi-Fi connection (say, at the beginning of the connection handshake), in a worst-case scenario anyone with a smartphone could shut down entire production lines.
Fortunately, these extremely vulnerable stages of 802.11 connections are rather limited and the packet specification is well documented. This makes it a perfect candidate for fuzzing.
As a prerequisite to automatic (fuzz) testing of 802.11 firmware and drivers, we must be able to arbitrarily construct 802.11 messages (called frames). In the OSI layer model, this would be on layer 2, the same level as cable ethernet. In theory, the so-called monitor mode, specified as one of the modes of operation within the 802.11 specification, allows this. In practice, this is more complicated, hence this article.
3 Hardware requirements
All of our experiments require rather low-level access to an 802.11 network device. In practice, this means that your 802.11 device must support what is called ‘monitor mode’. You can verify that by installing ‘iw tools’ from your distributions repository and checking the output of ‘iw list’:
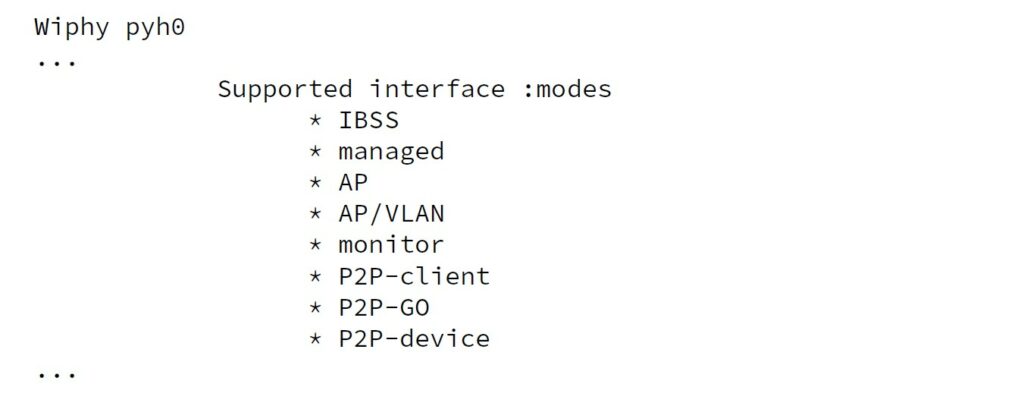
Figure 1: Output of ‘iw list’.
Once you’ve established that your device can handle monitor mode, you can use ‘aireplay-ng –test’ to test its injection capabilities[3]:
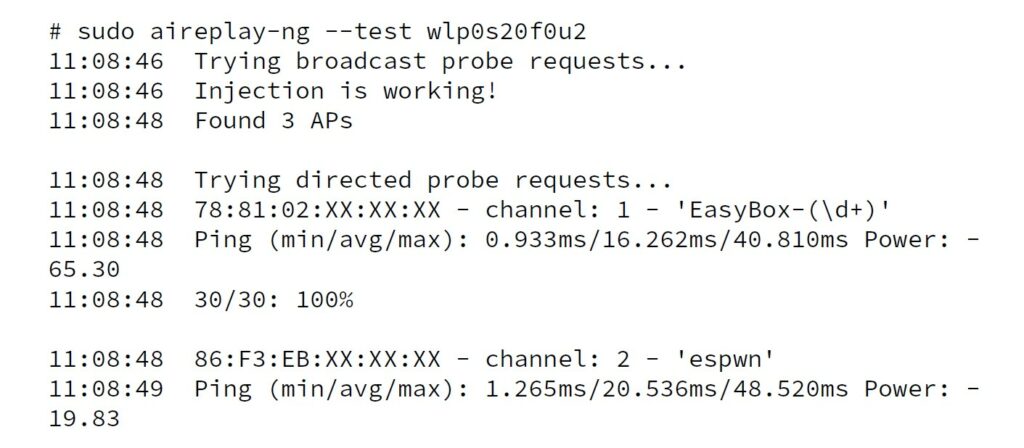
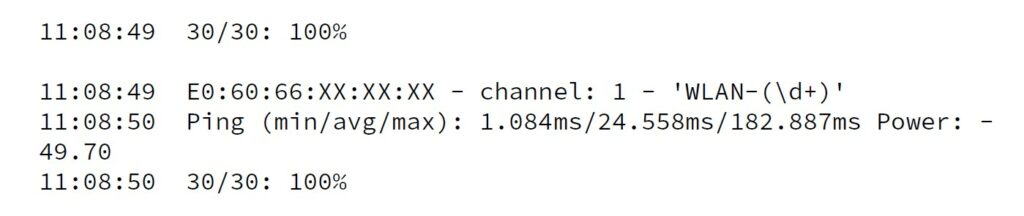
Figure 2: Run of ‘aireplay-ng –test’
However, just because aireplay reports that injection is working, it doesn’t mean that everything is working. Which leads us to…
3.1 Linux worst enemy: Wi-Fi drivers
Historically, Wi-Fi on Linux has always been a mess. For general usage, things have improved greatly[4]. Unfortunately, for 1337h4x0rs like us, nothing has changed, and the world still sucks. Today, most people use an intel Wi-Fi card (even in AMD systems). These are supported in the mainline kernel and usually support monitor mode and injection. However, this largely depends on your particular card, driver- and firmware version. For example, I have injection (and mostly monitor mode) working on an Intel AC8265 card but monitor mode on an Intel AC9560 returns inconsistent results. More on that in chapter 5.
That being said, if you are looking for a card to exploit with, shopping can be incredibly difficult. Model numbers of Wi-Fi cards on the market, be it internal PCIe based devices or USB dongles, rarely change. Instead, manufacturers release hardware revisions, which oftentimes completely change the chip and/or circuit design involved and, consequently, the driver used. This does also change the reported USB or PCIe identifier, but when presented with a box at the retailer you distrust least, it is impossible to determine the actual driver and firmware used in a given card.
If you want to build a reliable testbench, I recommend a spray and pray approach: Buy as many different cards as you can and sort them later. Old ones tend to have better driver support for all kinds of shenanigans while newer ones might offer additional features. The best card to use heavily depends on your use-case.
In the following sections, I will discuss some Wi-Fi drivers I used, what hardware I found them on and where to buy these[5].
3.1.1 ath9k/ath9k-htc (The good Atheros)
This is a good driver when it comes to injection capabilities and monitor mode in general, and also the one that gave me the fewest headaches. It is generally well supported and mainlined in the Linux kernel. Most Atheros chip sets that use these
drivers also have an open-source firmware available and work usually with whatever kernel version one can reasonably throw at them. The only difference between ath9k and ath9k-htc is the connection method: ath9k is for chips connected with PCI/PCIe, ath9k-htc for dongles connected via USB.
Notably, ath9k supports the full MTU of 2304 bytes specified in the 802.11 standard.
“But hang on, that sounds entirely reasonable, why wouldn’t it?” you ask? Oh gender-non-assuming-little-person, I’ve got news for you[6].
In 2022, ath9k is pretty much abandoned. Since Qualcomm acquired Atheros and merged their radio divisions, newer chips use the ath10k driver (see next section). Unless you happen to have an old card lying around, your best bet acquiring a device with a chip is a thrift store or second-hand market. This has the additional benefit that you can verify the hardware revision of the card you’re buying. For a list of supported chips, see for example, DeviWiki[7].
If, for reasons, you can’t buy second-hand, there are sellers on the brightly colored four-letter internet auction house[8] that sells ”new” (air quotes needed) USB dongles. However, be aware that at least the device I received was of poor build quality; and while the case and PCB were new, I can’t vouch for the used Atheros chip. It seems to be a recycled part, ripped off of another PCB. However, YMMV and you might as well receive a chip that came from new old stock. Unfortunately, that also means that you can never be sure that problems you encounter are actually caused by bad firmware or drivers or stem from the recycled nature of the Wi-Fi chip.
Another major limitation of the hardware this driver supports is its limitation to 2.4GHz 802.11 b/g, with most devices also supporting n and/or draft-n. For most applications, this will be fine as bgn is still widely supported. However, 802.11 is evolving and newer standards might add newer frame types that are unsupported with b/g/n or just will not be backported into the ath9k firmware. This is, for example, the case with the new frames introduced with 802.11ac to support beamforming[9].
3.1.2 ath10k (The bad Qualcomm/Atheros)
ath10k is the driver for newer Qualcomm/Atheros chips. Like ath9k, it’s mainlined and should work right out of the box. However, the firmware for these chips isn’t open source. The official stance of the kernel community seems to be that injection isn’t supported ”yet”[10], but this has been the case since at least 2015 with no serious efforts being made.
One exception to this is the ath10k firmware from Candela Technologies (ath10k- ct)[11]. This makes it possible to use raw frame injection on some cards but requires an additional out-of-tree patch.
If all you care about is monitoring, then ath10k seems like a reasonable and cheap choice that’s available off the shelf. If you need anything else, stay away from these chips.
3.1.3 Realtek
It is kind of unfair to summarize all of Realtek’s drivers for various chipsets – but only the “well, sometimes they actually do work” kind of unfair. There are two main problems with the Realtek drivers: First, they cap out with a maximum MTU of 1500 bytes[12], and second, even debian stable is too new to actually run them[13].
Driver updates are usually left to the OEM (e.g. TP-Link), who advertises Linux support on the box but only provides a shady zip archive with a bunch of files that ancient compilers might assemble to a kernel module if you’re lucky. Some chips like the RTL8192EU have some form of community maintenance effort going, providing patches to use modernish kernel versions and DKMS.
If the drivers do run, they work reasonably well. Monitor mode works, as does frame injection. If 1500 byte MTU is enough for your needs and you don’t fancy updating your kernel, Realtek chips are usable. Still, if you need to buy a chip, your money is probably better spent on something else.
There is also the realtek_rtWi-Fi[14] driver which is in the process of getting upstreamed, but still considered to be in beta stage. It’s based off of a softmac-mac80211 architecture, so its capabilities should be similar to the ath9k driver. It supports 8188e(us), 8192e, 8192c, 8723a and 8723b chips.
3.1.4 Ralink/Mediatek
Time for some confusion! Ralink was a manufacturer of Wi-Fi chip sets, which was eventually bought by Mediatek. The Linux drivers for the Ralink chips are mainlined and now also support some Mediatek devices. However, the name is still ralink because… don’t mess up people’s workflows, I suppose.
Linux drivers for some more modern Mediatek chips (MT76x0e, MT76x2e, MT7603, MT7615, MT7628 and MT7688) are co-developed by the openWRT team[15]. All of them require non-free firmware and use softmac-mac80211.
Monitor mode should be supported, and injection should work too. However, I only got my hands on an RT25xx device; so I can’t vouch for newer devices.
3.1.5 Broadcom
Broadcom, for the most part, pulled out of providing Wi-Fi chips for use in general purpose computers. However, they were used in many AzureWave products and Apple computers prior to the switch to the ARM platform used some BCM94xxx chips.
The driver situation for broadcom chips is a bit confusing. There are multiple drivers with overlapping support, some with software mac80211, some with hardware mac architecture. However, all drivers I tested are stuck at 1500 byte MTU. Both brcmfmac and brcmsmac should work right out of the box on modern Linux distributions if the appropriate firmware is available. Monitor mode should work normally.
However, the broadcom-wl family of drivers only support monitoring / injection via the PRISM interface and do not use radiotap. This may not be a problem per se, but if you found the radiotap documentation to be confusing, you will be relieved to know that this isn’t the case for PRISM: There simply is none besides some discussion on some mailing lists[16].
Broadcom SoCs like those found on the RaspberryPi do not offer injection capabilities out of the box. There is nexmon[17], which solves this problem for some PIs, but the MTU is still capped at 1500 bytes. Also keep in mind that nexmon doesn’t build on the latest kernels used by RaspberryPi OS versions[18].
3.1.6 Intel
iwlwifi is, generally spoken, the best modern Wi-Fi driver available on Linux. It is still bad enough to cause headaches and drive people to make memes about it[19], but it supports monitor mode and injection.
Most laptops and computers equipped with an intel processor come with an intel Wi-Fi card, so you might already have a card ready for experimentation. However, be aware that antenna placement inside notebooks can sometimes be problematic; and depending on the firmware used, I observed strange behavior of some cards (which I will discuss later in chapter 4).
Intel cards are always connected via PCIe and generally only come in mini-PCIe or M.2 form factor. You can adapt them to a full-size PCIe slot just fine, but you are out of luck if you only have a USB connection.
Also, if you rely on an intel card for your general network uplink, consider getting another card that is solely used for your experiments (so you can have internet access while tinkering).
3.2 Buyers Guide
Now that we discussed the different chip options, you are probably asking yourself what chip to buy. The most important rule on this is simple: The best chip to buy is the one you can get your hands on – with the obvious caveat that you would probably want to buy a chip that supports the features you need.
As mentioned in the beginning of this chapter, it is important to check which hardware version of a card you buy. Unfortunately, sellers often do not advertise this on their website, and manufacturers sell different hardware revisions with vastly different chips and circuit designs under the same SKU/EAN code. If you are unsure, ask – or at least make sure there is an appropriate return policy if the card you received does not work out in the end.
From my testing experience, there is no chip to absolutely avoid other than ath10k devices. I had different bad experiences with all chips I tried. If you can, get several different chips – especially different Realtek chips can be sourced quite cheaply (about 20ish Euros each). While they mostly use the same driver, they use different firmware, which is another point of failure entirely out of your control.
Personally, I would advise not to buy remanufactured devices if you can avoid them, as the build quality is very poor. However they are pretty cheap; so if you’re missing a chip that is only available as a remanufactured device (like ath9k devices), you might not have much of a choice.
4 Monitor and inject
Throughout this chapter, I assume to work with a sane Wi-Fi card that supports normal monitor mode, which spits out packets with a radiotap header. The general procedure should be the same for broadcom PRISM, but the specific commands most probably differ heavily. If needed, we assume ‘wlp3s0’ to be the interface we use for our shenanigans.
4.1 Preparation
It is important to know that using monitor mode – depending on your particular device and driver – might interfere with utilities like netctl, NetworkManager or other smart tools that manage your Wi-Fi connections. To avoid surprises like NetworkManager randomly deciding that it needs to take control of your Wi-Fi card, I recommend using a dedicated device not used for anything else and blocking all other tools from accessing it. On NetworkManager, you can do this by marking a device as unmanaged. This also means that you can no longer use NetworkManager to connect to Wi-Fi networks using this card.
To make your life easier, be sure to have another form of internet access nearby (like a phone, tablet, secondary network connection, another computer or friend to bother).
Most of the tools we are going to use do not come preinstalled with most Linux distributions, even if wireless network is installed, configured and working. On debian and its derivates you need to install the package ‘wireless-tools’ to get ‘iwconfig’ and friends.
4.2 Enabling Monitor Mode
To change the mode of an interface, we first need to set its state to DOWN, then we can change the mode to monitor and finally bring the interface back up:
ip link set wlp3s0 down
iwconfig wlp3s0 mode monitor
ip link set wlp3s0 up
You can check if these commands were successful by running ip a and observing the output. Figure 3 shows the output you should get when everything is working properly. Observe the second line where ‘ieee802.11/radiotap’ is noted as the link type of the interface.
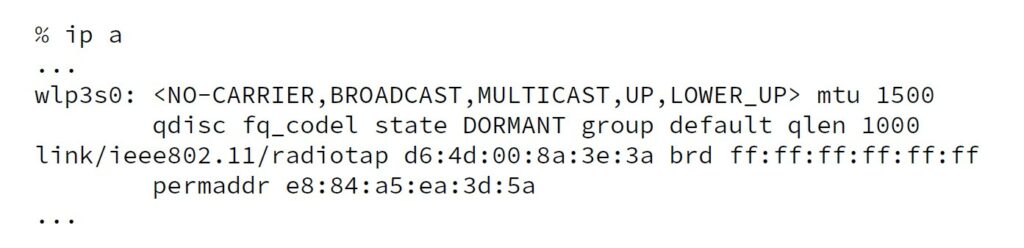
Figure 3: wlp3s0 has been switched to monitor mode.
In principle, you could now use ‘tcpdump’ to dump whatever frames your card is currently capturing. However, to capture anything useful, we first need to tune the card to a specific Wi-Fi channel. Make sure that your radio regulatory settings / Wi-Fi country code is up to date. Transmitting/receiving communications in non-open bands might be a criminal offence in your area.
You can obtain a list of the supported channels of your card from ‘iw list’. Channels that are marked as ‘(disabled)’ cannot be used. Be aware that some channels are marked with ‘radar detection’. As per regulations, these frequencies are also used for weather radar purposes; if a card detects radar activity, it must change its frequency as long as the radar is active[20].
Usually, this is not too big of a problem and should not affect you if you are only passively listening; however, this might be implemented in the firmware level and interfere with your monitoring/injecting workflow. For long-running experiments it is advisable to use a channel that does not have this dual-use. See also section 5.2 where I discuss some non-straight forward things regarding frequency selection.
4.3 Capturing frames
As with any packet-based (network) connection, ‘tcpdump’ is your friend. However, be aware that accessing the monitoring device requires root permissions. It is also possible to open a raw socket and receive all frames received by the device.
Since about 2015, the Linux kernel and its drivers have not presented raw 802.11 frames received on a device while in monitor mode. Instead, they prepend the frame by a synthesized radiotap header.
Radiotap is the de-facto standard for radio information of 802.11 frames. Its fields include signal strength, frequencies, used antenna(s) and much more. Documentation about the fields is available at https://www.radiotap.org.
4.4 Injecting frames
If you’ve read the buyers’ guide carefully, you now hopefully have a Wi-Fi card at hand capable of injecting frames. In principle, this is as easy as monitoring: Open a raw socket on the monitor device, ‘write(2)’ to the socket, and boom, you’re done. Everybody can go home now, world is saved.
Except it isn’t. As with receiving, you need to prepend the 802.11 frame with a radiotap header. Since radiotap is a variable-length header, the bare minimum should suffice; however, I found that in practice you need to set at least the options for ‘rate’, ‘tx_power’ and ‘antenna’.
The issue here is that while you need to set them in a way that the kernel actually accepts your radiotapped frame, you have absolutely no guarantee that neither the driver nor the firmware completely ignores your request and uses arbitrary settings if they see fit. What was actually sent is only visible after-the-fact because, as with all raw sockets, your freshly sent frame gets delivered into the read queue instantly, this time only with the radiotap header indicating the actually used values.
Having the frames actually delivered is kind of hit-and-miss. Some drivers and firmware take care of any retransmissions themselves, some don’t. The best strategy I came up with is sending the packet n times and setting the retransmission flag in all (n − 1) packets but the first. It’s far from a pretty solution, but it works well enough in practice to not cause any headaches.
5 Pitfalls
In this chapter, I discuss some approaches that did not work, and also why they did not work if I managed to figure that out.
5.1 Using a VM
I experimented quite a bit using VirtualBox and its USB Passthorugh capabilities. However, I never got a Wi-Fi connection to work properly. The device is detected by the guest OS but fails to initialize properly.
My best guess as to why this is, is that something goes wrong in the firmware loading process. Unfortunately, dmesg was not particularly helpful debugging my issues. I suspect that this might be a limitation in the USB filter VirtualBox uses on the host side. Other people on the internet also reported problems with no clear pattern emerging from the chips they used.
In principle, using a dedicated machine, VT-d (or IOMMU, if you fancy the red team) and PCIe-Passthorugh for a PCIe USB card should solve the problem, but if you are passing through an entire PCIe USB card, you might as well just pass through an actual Wi-Fi card.
5.2 Frequency Hopping
I’ll be the first to admit that this term is not technically accurate, but it makes for a good headline. Having that settled, we find that there is actually some truth to it.
To discover Access Points, 802.11 APs send out beacon frames in a regular interval and also in a response to a probe request. Listening for these regularly sent broadcast beacon frames is called passive scanning, while actively asking if an access point is here is called active scanning.
Passive scanning is always enabled and there is no way to disable it. This includes all connected states as well, and also the monitor mode. But what does that actually mean?
When a device is passively scanning for access points, it frequency-jumps through all channels valid for the current regulatory domain listening for beacon frames (so it can present a nice list of APs in range to your operating system). This is the same for both 2.4GHz, 5GHz and 6GHz Wi-Fi.
The side effect is that, if there are many Wi-Fi APs in range, packet captures are now littered with beacon frames on frequencies you are not interested in. Also, you might miss some frames (which is not too much of a problem, because they will be retransmitted anyways).
The most problematic issue is that it is in no way consistent between cards or drivers. Some cards seem to just stop passively scanning (which would be against the spec) or at the very least filter them on a firmware level. Other cards hop consistently and report all frames, and other-other cards hop sometimes and display half of the frames I would expect and also loose a ton of frames that are sent on the working channel (which, coincidentally, are captured just fine with another card on the same machine)[21].
So, bottom line: If you don’t succeed right away, try more Wi-Fi cards and pray to the goddesses of wireless radio communication.
5.3 Move fast and break things faster
One hard truth I discovered when fuzzing 802.11 implementation is that the software quality of the device firmware is really bad, regardless of vendor. Many firmware implementations just outright lock up, half-transmit frames or crash entirely when poked at with a bunch of invalid frames.
Unfortunately for me, these issues tend to cause overall system instability and weird, inexplicable kernel behavior[22]. I discovered test cases for nearly all Wi-Fi cards I tested with that lead to the kernel entering a spinlock and completely stalling the USB or network subsystem. These problems usually recover on physical disconnection of the offending device. My best guess as to why this happens is poor firmware quality, and without further useful debug information I don’t think it is useful to submit a bug report (even with an MWE). Peter Robinson from Red Hat also agrees on this[23], going even as far as calling the whole wireless situation some kind of Stockholm syndrome.
In any case – rectifying the situation for USB devices requires manual labor[24]. While software-controlled USB hubs do exist that can reset some ports on command, I found that on some test cases the reset process was stalled as well. I’d suggest grabbing a servo and 3D-printing yourself a little robot to unplug and plug the device. Be aware, though, that opening sockets might not work, so whatever you use to control this robot, make sure the connection is already open prior to stalling the system. Also, while I did not encounter a situation where I couldn’t send data over already opened connections, there certainly is no guarantee that this will never happen.
For PCIe, well, you’re mostly out of luck, unless you have an ExpressCard to PCIe or Thunderbolt to PCIe adapter and a host that supports arbitrary cards on either of them. Still, the cards I have encountered do not announce hot-plug capabilities, which means every time this problem occurs, you need to fully reboot your system. In particular, fully rebooting means doing a cold boot of the machine so every PCIe device is re-initialized. A simple reboot might not be enough to reset the card into a state from which it is operational again. If I needed to automate this, this would probably be the time where I buy a smart socket and just forcefully powercycle the machine (and use a read-only file system, so I don’t corrupt it while doing so).
5.4 Fuzzing
Additionally to all of the above, nearly all firmware is proprietary and closed source. This means that while with clever test case engineering we might be able to work around the issues and limitations given in a particular firmware image, the absence of proper abilities to debug these issues makes fuzzing foreign devices essentially impossible. There is simply no guarantee that any frame the fuzzer sends out gets into the air as-is. Moreover, since many Wi-Fi devices do not allow to send frames with the maximum 802.11 MTU, it’s impossible to push the limits of a standard conforming 802.11 implementation.
Thus, if fuzzing is your goal, be aware that you will always fuzz the used driver and the used firmware along the way. If your failure detection relies on detecting that your target becomes unresponsive, it might be extremely hard to distinguish between a crash of an out-of-scope firmware of the card used to send the 802.11 frame and a real test failure on the tested device. In practice, I found that it is far more likely to encounter faults on the sending side of the fuzzer than on the fuzzed receiving end. Working around these bugs by resetting made a modeling based fuzzing approach slow – to a point where it became impractical to run.
Still, if you want to try it on your own: Grab a copy of the excellent boofuzz, Sulleys successor. We contributed code to facilitate Layer 2 fuzzing, so all you have to do is whip up a model of the Wi-Fi subsystem you target and start fuzzing.
6 Conclusion
If you made it this far, congratulations! I realize that this text sounds, at times, more like a rant than a how-to. Unfortunately, while the general Wi-Fi on Linux situation has definitely improved, it’s still far from stable in edge cases. Also, for the general state of Linux Wi-Fi, meaningful improvements can only be achieved if hardware vendors actually start caring about their products and users. As demonstrated in this article and many accounts on the Linux wireless mailing list, the current dire situation is to a large degree due to problems fundamentally not fixable by the kernel developers.
Still, it is important to note that injection and monitoring now works for the majority of users out of the box by using their built-in intel Wi-Fi card.
[1] So much so, that you’ll be surprised how many people confuse internet access with access to Wi-Fi.
[2] https://github.com/0xd012/wifuzzit – obviously, some CVEs were involved.
[3] Note that in the figure, the MAC addresses are sanitized for privacy reasons. aireplay-ng will show you the full MAC.
[4] Some would even call it usable. I know, right?
[5] I interpret “where to buy” rather loosely here, because I do not want to promote a specific retailer. But it helps to know if the cards in question can be found at any retailer, the brightly colored four-letter auction house or the thrift store only.
[6] Well, at least in the next sections.
[7] https://deviwiki.com/wiki/Ath9k
[8] You can probably also find them on any Asia-to-rest-of-world electronics retailer and the online warehouse whose name is also the name of a river in South America.
[9] Which obviously also require a 5GHz radio.
[10] http://lists.infradead.org/pipermail/ath10k/2016-September/008456.html
[11] https://www.candelatech.com/ath10k-10.1.php
[12] Probably because that’s the default for cable ethernet and nobody bothered to change it in the driver or firmware. Also, told you so.
[13] If you ever wanted to answer ”What is Kernel 5.0?” d in a Hacker Jeopardy, here’s your chance.
[14] https://github.com/kimocoder/realtek_rtWi-Fi
[15] https://github.com/openwrt/mt76
[16] Which technically means that the documentation isn’t bad. What a mood, broadcom, what a mood.
[17] https://github.com/seemoo-lab/nexmon
[18] In fact, any kernel newer than 5.4 does not work without patches.
[19] https://www.google.com/search?tbm=isch&q=iwlWi-Fi+memes
[20] This also means that these frequencies are borderline unusable near airports. Ask me how I know.
[21] Hello, Intel.
[22] Also, hello to CVE-2022-42721
[23] https://lpc.events/event/16/contributions/1278/attachments/1120/2153/wireless-issues.pdf
[24] Irks.
Author

Katharina Bogad
Katharina Bogad joined Fraunhofer AISEC as a research scientist in 2020 after her studies in Computer Science at Technical University of Munich. Her research currently focuses on security hardening and validation of low power, low cost embedded device operating systems.
Contact: katharina.bogad@aisec.fraunhofer.de